Title Screen
When the game is launched, you are presented with a title screen. The screen is filled with stars and the camera is moving downward, causing the stars to rise in the background. The word "NetworKing" fades in followed shortly after by the NASA logo and the Space Communications and Navigation logo, which are near the bottom of the screen. Finally, smaller text appears just below the title instructing you to press any key to continue. After you press a key or click the mouse, the Main Menu screen appears.
Main Menu
The Main Menu screen is presented over a moving background which contains a view of the earth and stars. The earth takes up the bottom third of the screen. Above its horizon the stars are moving from left to right as the earth slowly rotates. In the left of the screen, situated on the earth, is a radome of greatly exaggerated size.
In front of all this is drawn the text of the menu. The menu is split into two columns. In the left, you can choose to start a new game or pick a saved game to resume by choosing the appropriate option from a list.
If you click on the new game button, then the right column shows a brief description of the role that you are about to take on. You're to become a Network Manager responsible for building and upgrading a communications network. There is an interface for choosing a name, a profession, and a color. The screen explains that the choice of profession grants an in-game bonus. You can choose from four professions: Scientist, Technologist, Engineer, and Mathematician. Pressing the Play button will begin the game.
If you click on one of the items in the list of saved games, then the right column changes to show the details of the saved game including character name, profession, color, creation time, and game progress. Pressing the Resume button will launch the game.
The Game
When the game starts there is a dialog showing the NASA and SCaN logos. It explains that your job is to build and upgrade a network that will provide vital communication and navigation services to spacecraft. When you dismiss the dialog, another one appears. This one says that you've unlocked the Near Earth Network.
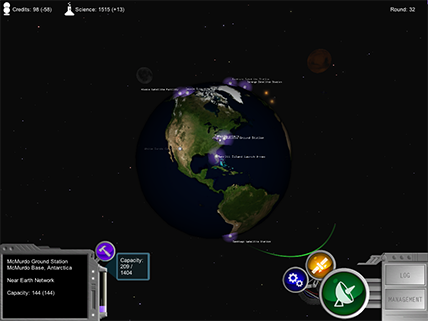
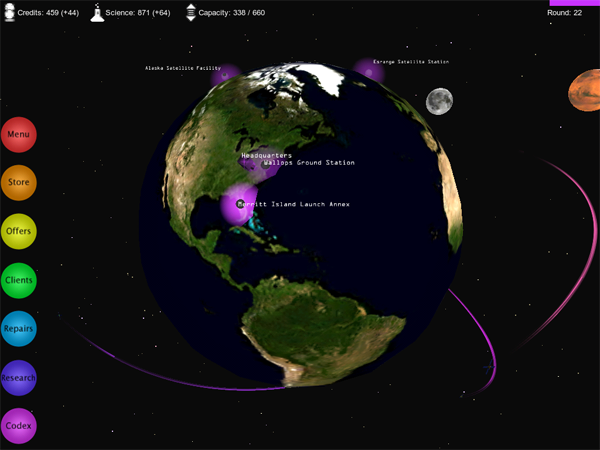
When you dismiss the dialog, your view is no longer obstructed and you can see Earth in the medium distance amid stars. You can use the WASD keys or the mouse to spin the camera around the earth. The sun, the moon, and Mars are visible in the distance. You can see two oversized buildings on Earth. One is a tall building labeled Headquarters. The other is a radome labeled Merritt Island Launch Annex. You can zoom in and out. At great distance, the nameplates fade from the buildings, but you can still see the light on the Headquarters building twinkling.
At the edges of the screen the interface is visible. In the upper left there is a resources counter that shows how many Credits and Science you currently have. The upper right shows which round of the game you're in, as well as a small bar that indicates the amount of time remaining in the current round.
In the lower left is a small screen that fills up with textual information whenever you click on an object such as a satellite or ground station. There is also a capacity gauge that indicates how much of your network's capacity is in use at any given time. A small button with a picture of a hammer opens the Repair interface.
In the lower right there is a series of buttons marked with gears, a satellite, and an antenna. They open the Research screen, the Offers screen, and the Store respectively. There are also plainly labeled buttons to open the Log and Management screens.
There is a small tutorial window on the left of the screen. It explains the game in broad terms: you'll have eventually unlock the Integrated Network, but it won't be easy. Along the way you'll need to build three major networks, earn Credits and Science by supporting client satellites, support special NASA missions, and deal with disasters.
If you press Escape or the question mark key then the Help screen appears. The Help screen provides a list of controls and buttons that let you return to the Main Menu, jump to specific tutorial topics, or put the game into full-screen mode.
Advancing through the tutorial you learn that game progresses in eight-second rounds. Every round you lose Credits paying for upkeep for your various ground stations. However, you'll also gain Credits and Science from any satellites that you're currently supporting. Each round you'll get new offers from clients that are interested in using your network. You can review these offers on the Offers screen.
Still following the tutorial you're prompted to open the Offers screen. When you do so, you see a window showing two contract offers side by side. Each offer shows a rotating models of the satellite, its name, its contract details, and short description of the satellite's mission. The contract details tell you how many Credits and Science the satellite will give you each round, how many rounds the satellite will fly, how much of your network's capacity the satellite will use, and the contract completion bonus. Below each offer are buttons labeled, "Accept."
The tutorial prompts you to accept both client offers since you still have 100 capacity available. As you do so you can see the satellites appear in orbit around the earth. Each has a long colored trail. You can also see the capacity gauge filling up. Even after taking on both clients there's still a bit of capacity left. You'll want to accept as many offers as you can without using more capacity than you have. If you take on more clients than you can support, then none of them will pay you!
Next, the tutorial explains the Contract Management screen. It's a quick way to look at all of the clients that you're currently supporting. If you need to, you can use this screen to decommission satellites, freeing up the capacity they were using. The screen is broken into several columns showing client name, capacity used, Credits per round, Science per round, bonus payout, rounds remaining, and trail color. You can sort the list of clients by any of these by clicking on the column's label. Choosing a client from the list reveals a button that lets you decommission a satellite. Pressing the button sends the satellite off toward a much higher graveyard orbit before it disappears.
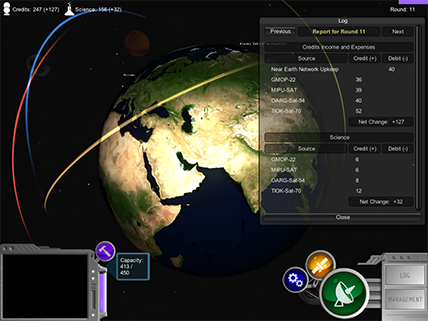
When you close all screens and tutorial windows, the game's timer begins and round one plays out. At the start of the next round you see the Offers button flash indicating that there are new offers. In addition, your Credits and Science increase to reflect your income from your network's clients. If you'd like to see round by round records of your incomes and expenditures you can open the Log screen at any time. For now, since there's still some capacity available, you can open up the Offers screen and take on another client.
At the start of the next round, your first two client satellites burst into a shower of gold and blue sparks that fill the sky above the earth. Their contracts have completed and they've paid their bonuses. You now have enough resources to visit the Store, but first you should take on some new clients.
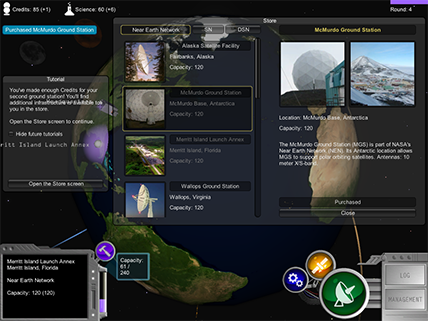
When you open up the Store you see a two-paned interface. The left-hand side presents a list of ground stations and network infrastructure. Tabs along the top let you choose to see components from the Near Earth, Space, and Deep Space Networks. For each item in the list there is an image, the name of the node, its location, and how much capacity it adds to your network. The right-hand side shows detailed information for the item currently selected on the left, including two additional pictures, some technical details, and the cost of purchasing the node.
Some items in the list are locked. You'll need to improve your network more before they become available for purchase. For the time being, there are three new Near Earth Network ground stations available to you. If you purchase one, you might see it appear on Earth at the base of a great pillar of sparks reaching far into space. Your new ground station is ready! Don't forget to accept more client offers to make use of your newly increased capacity.
In another round or two you should have enough resources to purchase your first upgrade.
Sure enough, after another client contract completes, the tutorial window appears again and suggests that you should use the resources you're earning to upgrade your network. When you open the Research screen you see a series of circular icons placed on a sparse grid. There are lines connecting some of them and it looks vaguely like a circuit board. Clicking on the icons causes the right-hand portion of the window to display details for the selected upgrade, including cost, description, and prerequisite upgrades. Each upgrade describes a real technology and the way in which unlocking the upgrade will affect your network.
Briefly reviewing some of the choices, you can see that the upgrades get more expensive the further down the board you go and that the lines connecting the upgrades indicates that one depends on the other. In the bottom left you see an upgrade called "Integrated Network," which lets you win the game. For the time being, you can only afford one of the choices on the top row. When you purchase an upgrade, you see its icon fill in with color.
Everything seems to be going well when disaster strikes! A notification pops up on the screen warning of trouble. This time it's with Alaska Satellite Facility. Moving the camera until ASF comes into view, you notice a red indicator floating above the radome. You can also see that your maximum capacity has dropped. If you're lucky, you can still support all of the clients on your network. If you find yourself overcommitted, you'll have to take action fast. It's best to try to fix the disaster before decommissioning any clients.
Clicking on the hammer icon will open the Repair screen. Affected stations are listed on the left. Choosing one from the list displays your options for addressing the problem on the right. There are two choices: you can pay for repairs with Credits or you can attempt to fix the issue yourself. The text explains that your chances of fixing the problem yourself are based on how much Science you have. If you fail in your attempt you'll increase the cost of repairs.
With your ground station repaired, you're back at full capacity. You settle into a rhythm of reviewing offers, building infrastructure, dealing with disasters, and advancing through the upgrade tree. Eventually, you reach the Large Apertures upgrade. When you purchase it, you see a dialog appear that tells you you've unlocked the Space Network and some new Near Earth Network ground stations. It's time to visit the store!
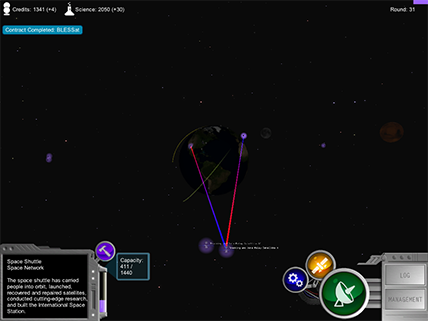
After you purchase the newly available Space Network infrastructure you can see the Tracking and Data Relay Satellite System (TDRSS) constellation out in the distance. If you select a TDRS by clicking on it, you can see its communication path with the ground. If you select TDRS 6, for example, you'll see a broad line, turning from red to purple along its length, connecting the satellite with the White Sands Complex on the ground.
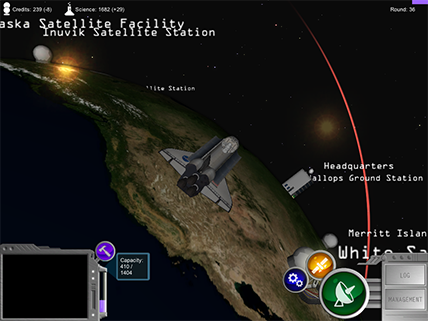
As you continue building the infrastructure necessary to advance through the upgrade tree, you'll unlock special NASA missions that are tied to particular upgrades. Unlocked missions will appear in the game marked by sparkles. ICESat, the International Space Station, and the Space Shuttle orbit the Earth. The Opportunity Mars Exploration Rover will appear on the Martian surface, while the Mars Reconnaissance Orbiter appears in orbit around Mars. The Kepler spacecraft trails Earth at a distance. If you select any of these missions by clicking on them you can see their communication paths drawn in real time. You can also press the V key to visit them. Visiting the Space Shuttle, for example will move the camera right up to the Shuttle so you can see the ground passing by below. Pressing V again will return you to your view of Earth.
At any point in the game, you can read more about the network nodes or NASA missions in the game's Codex. The Codex is organized like the Store. There are tabs for each of the networks as well as a tab for missions. The list of missions provides images and descriptions.
The game continues with the familiar cycle of building infrastructure, researching upgrades, attending to repairs, and accepting client offers. The sky is filled with orbiting satellites and mission spacecraft. Earth is ever more densely covered in infrastructure. You can see that when you select a network node, other nodes on the same network are also highlighted.
Eventually you'll earn enough resources to purchase the Integrated Network upgrade. The round after you unlock the Integrated Network the game ends. A dialog appears congratulating you on your successful game. There are blue and gold fireworks exploding in the corners of the screen. Closing the dialog returns you to the Main Menu.
